
People don’t land up on WordPress in their very first blogging experience. Hosts their websites on different platforms and come across its limitations and then finally resort to WordPress. For example Squarespace is a platform that is easy to use to create a websites but it has certain limitations. It does not allow you to work around your website and there are minimal options available on Squarespace to customize the website according to the demands. There are also a limited numbers of themes and templates to choose from. See here for a more comprehensive comparison of Squarespace vs. WordPress.
If you’re looking to migrate from Squarespace to WordPress but don’t know how to do it, we’ll teach you how. Follow these easy steps to migrate from Squarespace to WordPress.
- Find the hosting company
The first and foremost step required for migrating Squarespace to WordPress is to find a suitable and reliable website hosting service. Here, we would recommend BlueHost because they are official WordPress hosting partners and provides a free domain name when you sign up for a hosting account.
- Installing WordPress
Being the most used content management system (CMS) in the world, WordPress is easy to install. Login to your hosting account and click on control panel then navigate to website section. Most of hosting company provides one click installation of WordPress. Enter the domain name you would like to install to and enter your password. Installation will begin after this step.
If you don’t find a one click installation, then follow the manual process mentioned in below links,
https://codex.wordpress.org/Installing_WordPress
- Content that can be exported
Squarespace does not allow any automated method to transfer your content to any other platform. We have many pros and cons while migrating data,
Exportable Data:
- You can export only limited content
- Rest of the content you will have to manually copy and paste from there.
- You can export only one blog page as WordPress blog page
- Gallery pages along with text, images and embed blocks can be exported
Non Exportable Data:
- You cannot export product pages, album pages, event pages, audio, video and product blogs.
- You cannot export style changes and custom CSS from your squarespace website.
- Steps to export content
Following are the steps to export the content from your Squarespace website to WordPress:
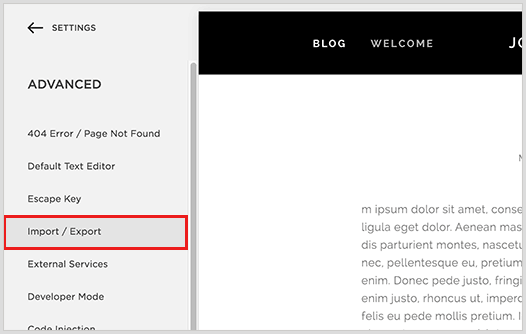
- Login to your Squarespace account with your credentials and go to Import/Export menu under the advanced settings tab.

- Click on the export button. A WordPress logo will appear, click on the logo to start the process.

- A progress bar displaying the progress of the export process will be displayed on the left under the Import/Export tab. Once the process is finished, click on the download button to download the export file.

- Now to integrate the downloaded content to your WordPress website launch wordpress and enter your credentials to login. Go to ‘import’ under ‘tools’ section to see a list of platforms you want to import the content from.

- Click on the WordPress from there as Squarespace will not be listed because it automatically exports in XML WordPress compatible file. Install the WordPress importer plugin by clicking on the install now button.

- After the completion of installation, click on the ‘activate plugin & run importer’ button to activate the plugin.

- On the next window, upload the export file of Squarespace from your computer. After the upload, import settings will appear. Choose the author name for the imported content. Check the download and import file attachments option and then click on submit to complete the process.

- To manually import the images, use the ‘Import external images’ plugin.

- To continue getting the traffic you were earlier getting on your SquareSpace website, you need to fix the Permalinks. Visit WordPress admin are and select permalinks from settings tab. Then you should select the specific “day & name” option. After that you should add ‘-1’ as prefix before everything like “/blog-1/%year%/%monthnum%/%day%/%postname%/” and then save the changes.

- If earlier, at Squarespace you had ecommerce features then now, at WordPress you need to install WooCommerce plugin to enjoy those features. It is never advisable to upload videos to your WordPress website. Therefore, if you had videos on your SquareSpace website then use a third party video hosting service to upload videos.
- Final Steps
Point your old domain to your new site with the control panel received from new hosting provider. I highly recommend that you contact your new WordPress hosting provider and ask them to help you out pointing your new domain. You can find some tutorials how to point a domain to your new hosting account.
http://help.squarespace.com/guides/opening-dns-settings
After you have migrated all your content, re-routed your domain name, there’s one last step i.e. change Your URL in WordPress account or database.
Conclusion
Finally you were able to migrate a completed Squarespace website to a new modern WordPress website. You don’t have any limitations in WordPress as you face in Squarespace. Now it’s time to learn how to optimize wordpress for better performance.